Author Topic: Project Handlebar  (Read 27911 times)

Project Handlebar
« on: 13 January, 2015, 02:09:25 pm »
Right. It's fettling weather and I want to get the handlebars on my Galaxy sorted out. (They're currently a bit bodged pending enough miles to know if the set-up's right for me, but I'm thinking it's probably close enough.)

Starting a dedicated thread in anticipation of lots of newbie questions as I go along...

First question: is this brake cable (between the front brake cross-top lever and the frame) a bit too long? I'm thinking I'd get a gentler curve if I trimmed it by a centimetre or two? (I'll also be fixing a mount for a bar bag, and this is fouling a bit as it is.


Second question, as I think through bar tape wrapping: I spend most of my time on the tops and hoods, really only going to the hooks on descents if I feel I need the extra leverage on the brakes. I'm dithering a bit about direction of wrap as most of the things I've read seem orientated towards time on the drops. Any thoughts?


Re: Project Handlebar
« Reply #1 on: 13 January, 2015, 02:22:03 pm »
Yes, it looks like you would get a better cable line if you trimmed the section of outer between the crosstop lever and the cable hanger. Perhaps 4 or 5 cm?

I'd aim to wrap bar tape starting at the bar ends and working towards the stem, with the wrap going over the top and down the outside on the section behind the drop lever. That way, your hand slides forwards onto the lever hood without lifting/rolling the exposed tape edge, and hands on the section of tape behind the lever tend to tighten the wrap.
It is possible to reverse the direction of wrap whilst going past the lever clamp.

Kim

  • Timelord
    • Fediverse
Re: Project Handlebar
« Reply #2 on: 13 January, 2015, 02:25:49 pm »
Can't think of a reason not to trim that.  LMK if you need some brake cable outer ;)

On a related note, I've got some shifters for you (somewhere).

I know almost nothing about bar tape, but AIUI starting at the bar ends is important for its reduced tendency to unwrap?

Re: Project Handlebar
« Reply #3 on: 13 January, 2015, 02:26:46 pm »
Personally I'd go for shorter but it's just aesthetics.   

I'd have the cable coming straight out horizontally then curving gracefully into the cable hanger barrel adjuster.

I managed to wrap my bars differently each side last time.   I don't notice any benefit or detriment for either side.   I start at the bar ends and usually work from inside to out so if you're looking from the rear forwards the left bar starts with an anticlockwise wrap, the right with clockwise. 

Re: Project Handlebar
« Reply #4 on: 13 January, 2015, 03:24:10 pm »
Yes, it looks like you would get a better cable line if you trimmed the section of outer between the crosstop lever and the cable hanger. Perhaps 4 or 5 cm?

Will compromise with several small snips and trying not to be too rash straight away!

work from inside to out so if you're looking from the rear forwards the left bar starts with an anticlockwise wrap, the right with clockwise. 

I keep getting lost when I try to visualise it - think I'm just going to have to get the tape out and do a dummy run!
Thing is I've got quite spongey tape, so it looks like it's 'undoing' whichever way I put pressure on it  :facepalm:
Will have to have a think about the direction change option too.

I know almost nothing about bar tape, but AIUI starting at the bar ends is important for its reduced tendency to unwrap?

More unpeeling sort of thing - think roof tiles. Bar-ends to centre is the one bit I'm clear on! That and that I don't like insulation tape...

LMK if you need some brake cable outer ;)

 ;D Only if you've got a bit you can spare...

Biggsy

  • A bodge too far
  • Twit @iceblinker
    • My stuff on eBay
Re: Project Handlebar
« Reply #5 on: 13 January, 2015, 03:38:43 pm »
It's not just aesthetics if a gentler curve would reduce cable friction.  It's worth shortening if pulling the lever feels harder than it should.

Direction of wrap: think of the tape as going downhill when you slide your hands on the tops towards the hoods, so you don't ruck it.  You need to start taping from the bar ends to get this.

Stretch the tape hard as you apply it.
●●●  My eBay items  ●●●  Twitter  ●●●

Re: Project Handlebar
« Reply #6 on: 13 January, 2015, 04:16:02 pm »
Nikki,
You should be looking for a cable length which allows the ferrule (and outer cable) to leave the brake lever and enter the brake caliper in a straight line not, as your photo shows, at an upward angle.
Yours is, as you've said, too long. Cut a little off at a time and offer it up to both components - it doesn't need the inner inside it to do this.
Cut too much off the outer cable, and you'll be back in the irreversible situation of the ferrule leaving the brake lever / caliper at an angle - at which point it is time to reach for your next bit of Jagwire outer cable and cut it a little longer than the one you are about to bin....
DAHIKT
Those on the forum who have more of an understanding of Bezier curves than I do will doubtless be able to explain how to achieve exactly the right length for outer cables.
I tend to rely on patience, a healthy supply of outer cable (always handy to have, it'll not go off, you'll use it sooner or later, a good pair of cutters and a Dremel for finishing - I suspect you may already have the latter......)
The only thing which surprises me is that we're 7 posts in and no one has recommended removing the dado rail. That's bound to be obstructive when cornering.

Kim

  • Timelord
    • Fediverse
Re: Project Handlebar
« Reply #7 on: 13 January, 2015, 04:30:32 pm »
a healthy supply of outer cable (always handy to have, it'll not go off, you'll use it sooner or later

This was my logic.  Which is why I now have a 197m roll of the stuff...   ::-)

OTOH, it did come in handy when trial-and-erroring cable lengths on the (notoriously cable-length-sensitive) Brommie.

Re: Project Handlebar
« Reply #8 on: 13 January, 2015, 05:12:19 pm »
....... I now have a 197m roll of the stuff...   ::-).......

 :o :o :o Put the kettle on!
I'm bringing all five bikes round  ;D ;D

Here's the thing (which I have no doubt whatsoever you have already in hand) Always start with the longest cable which needs replacing - that way when you have shown abject recklessness with the cutters, the outfall will still be useable on the shorter runs.....

Kim

  • Timelord
    • Fediverse
Re: Project Handlebar
« Reply #9 on: 13 January, 2015, 05:21:02 pm »
....... I now have a 197m roll of the stuff...   ::-).......

 :o :o :o

I know!

I was in need of cable outer (and pingfuckits of some description that made SJS the place I was ordering from), and it came down to 30m for 30 quid (Shimano) or 200m for 50 quid (unbranded stuff that they use as OEM cables on Thorn bikes, which appears to work just as well).  I thought about it for a bit and decided it was entirely possible that I would get through 30m eventually (two bents and a folder with fully-enclosed cable runs), so went for the 200m.  It means I don't have to be shy about bunging new outer on the recumbents after exposure to Welsh weather knackers the cables.

A 200m roll of cable outer is surprisingly unwieldy. 

Re: Project Handlebar
« Reply #10 on: 13 January, 2015, 05:28:05 pm »
I'll bet that roll is quite heavy  :D.

Kim

  • Timelord
    • Fediverse
Re: Project Handlebar
« Reply #11 on: 13 January, 2015, 05:32:25 pm »
Makes up for all those times they charged £2.50 shipping for a couple of bolts.   ;D

Re: Project Handlebar
« Reply #12 on: 13 January, 2015, 05:34:25 pm »
I share your pain  ;D

eck

  • Gonna ride my bike until I get home...
    • Angus Bike Chain CC
Re: Project Handlebar
« Reply #13 on: 13 January, 2015, 05:56:55 pm »
When cutting already installed outer cable to length, it is usually a Good Idea ™ first to remove the inner cable.
Only an idiot would fail to do that.  :-X
It's a bit weird, but actually quite wonderful.

Re: Project Handlebar
« Reply #14 on: 13 January, 2015, 07:20:08 pm »
Gynararghargaerghargh!

Best laid plans...

I concentrated really, really hard to remember to remove the cable before cutting the gear outer (about 7 cm) and it's now looking much better:


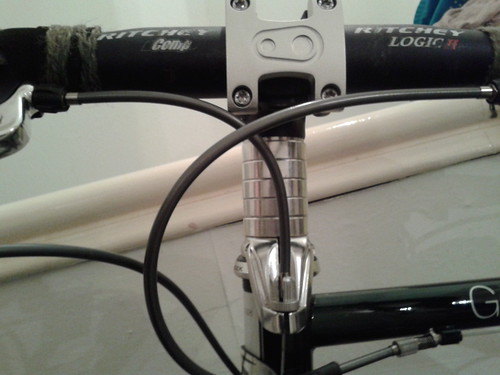
Reducing friction was my original thought, rather than aesthetics, and there does seem to be a difference. Re-setting of brakes and GT45 has also happened too, so not entirely sure.

I then removed the old bar tape - so far so good - and offered up the new stuff to try and get an idea of how far it would reach. Cue backing falling off all over the shop so I just had to run with it and commit to a final wrap - yikes! Fortunately scissors and the packet were juuuuust within reach, but it's a bit tricky trimming the under-brake-lever lengths whilst also trying to keep the tension on the already wrapped tape! Kind of managed it though, and the result wasn't too shonky.

On with the other side.

'kin adhesives!

This roll had managed to sneak past quality control with the adhesive strip adhesive oozed out onto the front face of the tape. ...Only far enough along that I kind of had to keep going, of course... Urgh! Sticky stuff all over my fingers and no shortage of shonkiness. Bah! Not so happy with that one. ::sideways sulky face::

Looks like the oozed adhesive is lifting off with gentle proddling with a finger, but it's a very messy job. Also the supplied tape to finish off the end is RUBBISH! Will have to replace that with something else, but I'm thinking I might give it a miss tonight...

*takes a deep breath*


A 200m roll of cable outer is surprisingly unwieldy. 

And yet blends in so well with the rest of the contents of the living room!


a Dremel for finishing - I suspect you may already have the latter......)


 :thumbsup: It's on standby for later on in the project...


The only thing which surprises me is that we're 7 posts in and no one has recommended removing the dado rail. That's bound to be obstructive when cornering.


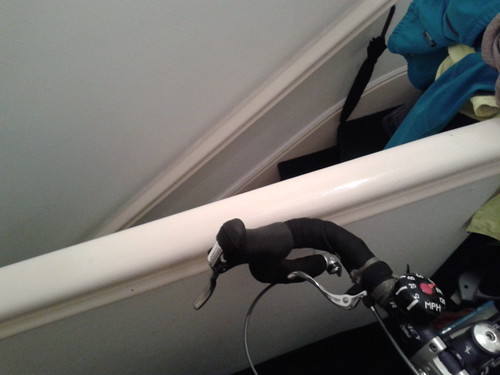
It's the handrail for the bannister bit for the stairs to my attic flat. Obstructive cornering is its defining feature.


I think I'm going to have a bit of a lie down.


Re: Project Handlebar
« Reply #15 on: 13 January, 2015, 07:37:29 pm »
Re b ar tape. Take a look at the park tools website for pictures of how to wrap the tape. Start at the end of the drops and work towards the tops. Some double sided tape on first to help hold the start of the tape. Wrap "outwards" until you get to the levers then straight up the inside of the lever and start wrapping "backwards" along the tops.
We are making a New World (Paul Nash, 1918)

mcshroom

  • Mushroom
Re: Project Handlebar
« Reply #16 on: 13 January, 2015, 07:40:07 pm »
Looks very neat. I am now trying to studiously ignore the extra cable on the front brakes of my tourer ::-)
Climbs like a sprinter, sprints like a climber!

Re: Project Handlebar
« Reply #17 on: 13 January, 2015, 07:52:45 pm »


Nikki,
I've been pi§§ing around in photoshop for the last couple of hours.
PS is not one of my key skills.
The pic you have posted is pretty much exactly as the one I was trying to contrive....
That'll do nicely  :thumbsup:
Spot on!

Biggsy

  • A bodge too far
  • Twit @iceblinker
    • My stuff on eBay
Re: Project Handlebar
« Reply #18 on: 13 January, 2015, 08:05:01 pm »
The cable shortening saved a few grams as well.  :)

A spot of superglue is good for securing the ends of handlebar tape, then insulating tape over the top for a smooth finish (but with superglue on the ends of the insulating tape, too, otherwise it undoes in warm weather).
●●●  My eBay items  ●●●  Twitter  ●●●

Re: Project Handlebar
« Reply #19 on: 13 January, 2015, 08:15:09 pm »
Re b ar tape. Take a look at the park tools website for pictures of how to wrap the tape. Start at the end of the drops and work towards the tops. Some double sided tape on first to help hold the start of the tape. Wrap "outwards" until you get to the levers then straight up the inside of the lever and start wrapping "backwards" along the tops.

That's what I was going to try a dummy run of before it all got sticky  :facepalm:
Next time I'm thinking I'll not get bar tape with adhesive strip!

Looks very neat. I am now trying to studiously ignore the extra cable on the front brakes of my tourer ::-)

Thanks. And sorry  ;D
(Ta for the gear shifters that I will at some point collect from Kim, too btw - will endeavour to get the cabling exquisitely routed!)


I've been pi§§ing around in photoshop for the last couple of hours.
PS is not one of my key skills.
The pic you have posted is pretty much exactly as the one I was trying to contrive....
That'll do nicely  :thumbsup:

Heh! Thanks for trying and sorry I beat you to it!

The cable shortening saved a few grams as well.  :)

 ;D   :thumbsup:

A spot of superglue is good for securing the ends of handlebar tape, then insulating tape over the top for a smooth finish (but with superglue on the ends of the insulating tape, too, otherwise it undoes in warm weather).

I'm not sure I can be trusted with superglue, but I know what you mean about insulation tape. Yuk.


Kim

  • Timelord
    • Fediverse
Re: Project Handlebar
« Reply #20 on: 13 January, 2015, 08:20:11 pm »
With a bit of forward-planning, you could use heatshrink instead of Lx tape...

Cudzoziemiec

  • Ride adventurously and stop for a brew.
Re: Project Handlebar
« Reply #21 on: 13 January, 2015, 08:20:49 pm »
Nikki, it sounds as if you are almost as skillful with adhesives as I am. This is heartening.

http://youtu.be/H5je_eK0V1w

(needs a lot more Pritt and less wind-up characters, really)
Riding a concrete path through the nebulous and chaotic future.

Basil

  • Um....err......oh bugger!
  • Help me!
Re: Project Handlebar
« Reply #22 on: 13 January, 2015, 08:36:08 pm »
With a bit of forward-planning, you could use heatshrink instead of Lx tape...

Ooh.  :thumbsup:  :thumbsup:  Although Forward Planning and Basil have never really been a thing, I'm liking that so much that I've filed it in brain with a fluorescent page marker. 
I hate putting insulting tape on my bike.  (So why is there so much then?  :facepalm: )
Admission.  I'm actually not that fussed about cake.

Biggsy

  • A bodge too far
  • Twit @iceblinker
    • My stuff on eBay
Re: Project Handlebar
« Reply #23 on: 13 January, 2015, 08:46:20 pm »
Heatshrink is relatively thick, so there wouldn't be such a smooth transition.  But that's me being terribly fussy (and also wanting as much of the bar as possible being hand-friendly).
●●●  My eBay items  ●●●  Twitter  ●●●

Re: Project Handlebar
« Reply #24 on: 13 January, 2015, 08:49:40 pm »
I look forward to seeing the results of that experiment, Basil!


This is heartening.

Not bad, not bad. I'll meet your heartening adhesive-based sentiment and I'll raise you a John Hegley:


This could be heaven

He's known you for under a week
and he wonders if he's under a spell
it's as if he's been living in a shell
and for the first time ever
he's poked his rocker out.
He feels like a knocker
that's discovered its bell
like some sellotape
realising it's more self-expressive
sticking something
than being stuck on a roll
he feels whole
and it's hell
is it just his imagination
or is it yours as well?