Author Topic: Setting up dynamo  (Read 2201 times)

Setting up dynamo
« on: 22 July, 2021, 10:33:37 am »
As it says, really, I'm look for tips on completing my dynamo setup.

SP-PD7

Kemo M172N

Schmidt Edelux II

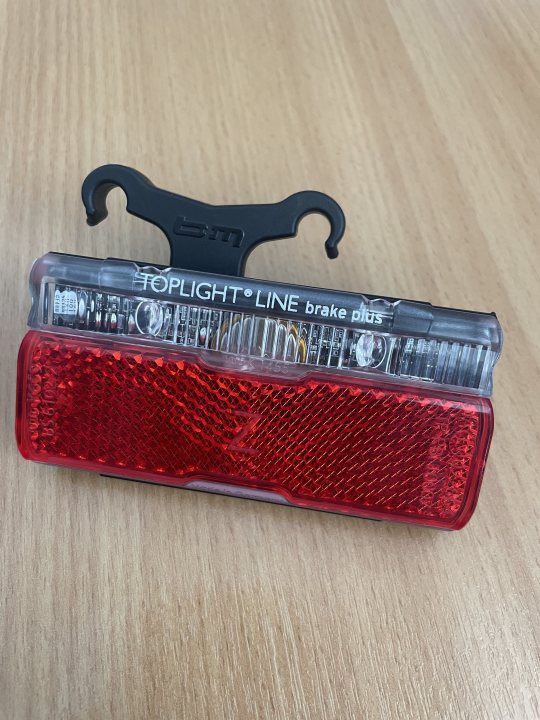
B&M Toplight Line Brake Plus

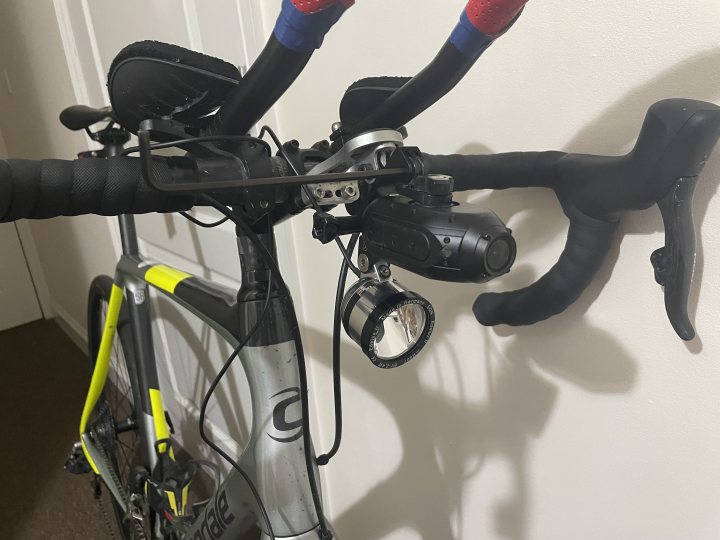
My main question is how to connect the Kemo USB. It has some holes, I know that "frame" is on a hiding to nowhere with carbon, just set it up as a common ground. No, my question is actually about the physical connection - do I just jam the cable in there or something?

Next, mounting the toplight. As you can see I have a saddle rail hanger, but it seems loose - came off on the commute this morning. I'd also like a saddlebag. Is there anything that can strap to the seatpost and support an 80 mm spacing? I'm sure I could bodge something together using the loop on the back of my saddlebag, but I do value neatness.

Talking of neatness, cable routing. I'm hoping I'll be able to get a cable to the rear of the bike alongside my internally routed brake line. But the connection from the dynamo to the light (although this will end up being the USB charger) - it's on the wrong side of the frame to do that. Is there any chance that there are 12 mm thru axles with a hole in the middle for a dynamo cable? Again, really just neatness, but I'd rather not use cable ties or have the cable dangling around my wheel.

Re: Setting up dynamo
« Reply #1 on: 22 July, 2021, 02:23:06 pm »
Rear lights are so good today, I just use a USB one. Saves cable running along top tube. If you are worried about rear light going dead just carry a very short lead and plug it into the USB unit during the day if going through the night. Have a Lupine rotlight, revolution USB and Schmit dynamo and light. Large o- ring fixes USB to bike as it is waterproof. Is your light the upside down one?

Re: Setting up dynamo
« Reply #2 on: 22 July, 2021, 04:18:21 pm »
Rear lights are so good today, I just use a USB one. Saves cable running along top tube. If you are worried about rear light going dead just carry a very short lead and plug it into the USB unit during the day if going through the night. Have a Lupine rotlight, revolution USB and Schmit dynamo and light. Large o- ring fixes USB to bike as it is waterproof. Is your light the upside down one?
Upside-down light, yes. I'm not going to be running the cable along the top tube - I've identified that the hi-mod synapse has screw holes for mounting mudguards, maybe even a rack. But I was pleasantly surprised to find that a piece of wire inserted into such a hole actually went straight through.

So I'll be internally routing the cables. I'm always nervous about ensuring that my lights are working and charged up. Having a dynamo alleviates both of those concerns - I'm sure there'll be some way of indicating that a current is flowing through the cable to the rear light, even if it's an LED attached to a coil of wire.

Kim

  • Timelord
    • Fediverse
Re: Setting up dynamo
« Reply #3 on: 22 July, 2021, 04:20:38 pm »
If you are worried about rear light going dead just carry a very short lead and plug it into the USB unit during the day if going through the night.

Is the wrong answer.  The way to ensure that your rear light isn't dead is either:

a) Something at the front that indicates the light is working
b) More than one rear light

That said, dynamo lights (when mounted solidly without the cable being vulnerable) are highly reliable, and I frequently ride on dyanmo rear alone.

Re: Setting up dynamo
« Reply #4 on: 22 July, 2021, 09:59:30 pm »
The way to ensure that your rear light isn't dead is either both:

a) Something at the front that indicates the light is working
b) More than one rear light

That said, dynamo lights (when mounted solidly without the cable being vulnerable) are highly reliable, and I frequently ride on dyanmo rear alone.

FTFY
Some front lights have a tell-tale LED which lights up to tell the user that the connection to the rear is drawing power.
This has saved me on a number of occasions, despite tendency to ride on rear dynamo alone.
No tell-tale light:  too dark, too tired, too wet, too cold or just cba to diagnose the fault? then switch on the battery back-up.


rogerzilla

  • When n+1 gets out of hand
Re: Setting up dynamo
« Reply #5 on: 22 July, 2021, 10:02:14 pm »
Isn't the rear reflector for when the light craps out?
Hard work sometimes pays off in the end, but laziness ALWAYS pays off NOW.

Re: Setting up dynamo
« Reply #6 on: 22 July, 2021, 10:08:29 pm »
Rear reflectors on bikes tend to be the last thing I see when driving. Retroreflective fabric and orange pedal reflectors are far more noticeable.

I have a vague fear of crashing and/or fainting* on a pitch Black Country** lane so try to have a battery light switched on if riding alone after dark.

(* I came very close on Brasted Hill the first time I did Greenwich Mean Climb)
(** autocarrot is a secret Brummie)

BFC

  • ACME Wheelwright and Bike Fettler
Re: Setting up dynamo
« Reply #7 on: 23 July, 2021, 07:11:42 pm »
I have had two dynamo rear lights where the standlight function died - due to poor connection to the supercapacitor that provides the reserve of electrons whilst static.
One failure is on a B&M secular, mudguard mounted, usually sorted by hitting it (on a particulaly harsh bike set up, steel track fixed with 23mm tyres). I have not tried splitting this model to access the supercap after first expolorations gave the idea the casings would explode and become unrepairable
The other failure is on a Toplight Line plus Brake which is rack mounted. This was fixed by splitting the casings and re springing the contacts to the supercap, then superglue to re build the light.

Just because the telltale on the front light is on it does not guarantee a dynamo rear light is still glowing when you stop (typically at traffic lights).
Two rear lights is always a good plan, preferably using different technologies or manufacturers with different failure modes.

Kim

  • Timelord
    • Fediverse
Re: Setting up dynamo
« Reply #8 on: 23 July, 2021, 07:14:48 pm »
That seems to be a chronic problem on all makes.  The spot-welds between the case and legs of the supercap just aren't up to the amount of vibration they're subjected to.  It's telling that they tend to fail before the crappy lead-free solder joint does.

I took the liberty of blobbing hot glue all over the supercap in my Brompton rear light (which is meh performance-wise, but thankfully held together by screws) in an attempt at mechanical reinforcement while I was fitting a gravity-operated discharge switch.  So far it's held up.

Re: Setting up dynamo
« Reply #9 on: 23 July, 2021, 10:27:37 pm »
Well, I finished setting it up!

I need finer wire if I want to internally route the dynamo cable, unfortunately. Awaiting cable ties, but I'm pretty happy with the routing of the rear light, both standlights operate, and switching to USB mode works like a headlight flash ;D

Re: Setting up dynamo
« Reply #10 on: 23 July, 2021, 11:48:45 pm »
Have you tried thin enamelled wire?

Re: Setting up dynamo
« Reply #11 on: 23 July, 2021, 11:58:48 pm »
Have you tried thin enamelled wire?
No, the wire I ran to the rear light was some twin core doorbell wire from B&Q, which is rated for 2A and ~30V, so slight overkill. I would be reticent about pushing down below a 1A rating for the main dynamo connection, not to mention the insulation rating being a potential issue when unloaded.

Kim

  • Timelord
    • Fediverse
Re: Setting up dynamo
« Reply #12 on: 24 July, 2021, 12:27:18 am »
If you're using bell wire, then the next logical upgrade would be the lovely Schmidt coax.  Circular cross section of 3mm diameter, if that's small enough.  It's also BLACK, highly flexible, pleasingly robust and somewhat more irksome to terminate.

Re: Setting up dynamo
« Reply #13 on: 24 July, 2021, 08:22:37 pm »
If you're using bell wire, then the next logical upgrade would be the lovely Schmidt coax.  Circular cross section of 3mm diameter, if that's small enough.  It's also BLACK, highly flexible, pleasingly robust and somewhat more irksome to terminate.
The light came with coax. Too bulky for the hole. If anything the doorbell wire is closer, I could probably get one of the two wires through, but unless I wanted to use the axle as a ground connection...

The doorbell wire was because it was available at B&Q, rather than waiting. Also helpfully flat when running it through a hole with a preexisting hydraulic hose.

Kim

  • Timelord
    • Fediverse
Re: Setting up dynamo
« Reply #14 on: 24 July, 2021, 09:27:48 pm »
Hm.  On the basis I've got plenty lying around I'd be tempted to try a single pair from a cat5 cable (think that's 24 gauge?  should be fine for the current, given PoE ratings), but the insulation isn't particularly robust.

BFC

  • ACME Wheelwright and Bike Fettler
Re: Setting up dynamo
« Reply #15 on: 25 July, 2021, 11:09:54 am »
You could look into using Kynar wire. Its a single core wire which is strong and flexible, used extensively in wire wrapping prototype builds and pcb rework or repair. Insulation is ultra thin, ultra slippery and tough. Available in a range of colours.

It responds well to DIY twisted pair construction, I have used it for dynamo rear lights, overall diameter of a twisted pair is 0.94mm.

Its a pain to strip and rather fiddly to put the monster terminals for dynamo lights on. Solders nicely without destroying the insulation.

I use hellerman sleeves at rub and clamping points to give conventional fixing methods (clips and cable ties) something to grip, these need to go on before the terminals.

Re: Setting up dynamo
« Reply #16 on: 25 July, 2021, 06:20:40 pm »
You could look into using Kynar wire. Its a single core wire which is strong and flexible, used extensively in wire wrapping prototype builds and pcb rework or repair. Insulation is ultra thin, ultra slippery and tough. Available in a range of colours.

It responds well to DIY twisted pair construction, I have used it for dynamo rear lights, overall diameter of a twisted pair is 0.94mm.

Its a pain to strip and rather fiddly to put the monster terminals for dynamo lights on. Solders nicely without destroying the insulation.

I use hellerman sleeves at rub and clamping points to give conventional fixing methods (clips and cable ties) something to grip, these need to go on before the terminals.
I just had a look at the datasheet of that - my current wire is either the Schmidt Coax at 3mm outer diameter, or the doorbell cable is similar. The mudguard bolt is M3, which makes sense. So Kynar definitely would fit! As for electrical specs, I'm seeing a 300V rating. But the reel I was looking at was rated for only 0.4A - probably fine for an external mounting, given the airflow, but internal routing would make me pause. A size up should be fine though. 27 AWG has a 0.1mm2 cross section (vs 0.05), and root 2x the diameter.

Re: Setting up dynamo
« Reply #17 on: 25 July, 2021, 07:09:38 pm »
Have you measured the actual current draw of your rear lamp? It’s likely an order of magnitude or two less.

BFC

  • ACME Wheelwright and Bike Fettler
Re: Setting up dynamo
« Reply #18 on: 25 July, 2021, 07:14:23 pm »
You could look into using Kynar wire. Its a single core wire which is strong and flexible, used extensively in wire wrapping prototype builds and pcb rework or repair. Insulation is ultra thin, ultra slippery and tough. Available in a range of colours.

It responds well to DIY twisted pair construction, I have used it for dynamo rear lights, overall diameter of a twisted pair is 0.94mm.

Its a pain to strip and rather fiddly to put the monster terminals for dynamo lights on. Solders nicely without destroying the insulation.

I use hellerman sleeves at rub and clamping points to give conventional fixing methods (clips and cable ties) something to grip, these need to go on before the terminals.
I just had a look at the datasheet of that - my current wire is either the Schmidt Coax at 3mm outer diameter, or the doorbell cable is similar. The mudguard bolt is M3, which makes sense. So Kynar definitely would fit! As for electrical specs, I'm seeing a 300V rating. But the reel I was looking at was rated for only 0.4A - probably fine for an external mounting, given the airflow, but internal routing would make me pause. A size up should be fine though. 27 AWG has a 0.1mm2 cross section (vs 0.05), and root 2x the diameter.
PM me if you need to learn the tricks for DIY twisted pairs, basically how to aviod making a pair of wires that try to contort themselves into a 4 core rope.

Re: Setting up dynamo
« Reply #19 on: 25 July, 2021, 07:28:57 pm »
Kynar is simply the insulation type. 
Heating effect.  Lets take a 26AWG (since you mentions 27AWG) single strand wire.  It has a resistance of 44 milliohms per foot (according to Raychem 1/0.4 stranding).  Out and back from your front light, lets say 8 feet (very generous) i.e 354 milliohms.  Old filament lamps were 0.1A and modern LED are likely to be less, but lets say 0.1A.  Heating effect in the wire is therefore 0.0003W.  i.e not noticeable.

Kynar insulated wire for wire wrapping is usually 30AWG at roughly 100 milliohms per foot, so 2.5 times the figures above but still insignificant.

Re: Setting up dynamo
« Reply #20 on: 26 July, 2021, 08:41:22 am »
Kynar is simply the insulation type. 
Heating effect.  Lets take a 26AWG (since you mentions 27AWG) single strand wire.  It has a resistance of 44 milliohms per foot (according to Raychem 1/0.4 stranding).  Out and back from your front light, lets say 8 feet (very generous) i.e 354 milliohms.  Old filament lamps were 0.1A and modern LED are likely to be less, but lets say 0.1A.  Heating effect in the wire is therefore 0.0003W.  i.e not noticeable.

Kynar insulated wire for wire wrapping is usually 30AWG at roughly 100 milliohms per foot, so 2.5 times the figures above but still insignificant.
I'm happy with the rear cable for now - it's really the front routing that gets a bit untidy. So 0.5A at variable voltage, and a 2ft run conservatively, so 0.05W. But with a diameter of 0.26 mm, it still could heat up quite considerably (to ~60 degrees C, according to Wikipedia). I found some nice cheap Sillicone insulated 28 gauge, so I've bought that.

Re: Setting up dynamo
« Reply #21 on: 29 July, 2021, 07:45:06 pm »


Lovely  ;D