Author Topic: Mercian bike fit experience  (Read 27801 times)

Re: Mercian bike fit experience
« Reply #25 on: 12 June, 2018, 05:33:43 pm »
I mentioned about three different schemes, is there one that you are most interested in?

FWIW this is a type of sliding joint used to leave part of the rear mudguard on the bike


popular with rinko types, I believe. To make this kind of joint it is useful to have a captive nut in one half of the joint; the nut is made and sold separately so that you can adapt mudguards to suit.

cheers


Re: Mercian bike fit experience
« Reply #26 on: 12 June, 2018, 05:53:37 pm »
re mudguards and bike transport.  You can, if you are prepared to put your mind to it, come up with all kinds of things that make this less of a schlep.
For example on one bike that travelled every weekend, I had slotted mounts at the brakes, and double nuts on nutted brakes; the mudguards were QD as a result, just by loosening the outer nut. [The stay mounts on the frame were done with wing nuts, but these days I'd probably use secu-clips front and rear]. The result was that the mudguards could be on or off inside two minutes.
However there are other options; for example using brackets that are about 2" long and are captive on the hub axles, you can mount mudguards  to the wheels. You loosen the joint at the other end of the 2" bracket to a) let the chain out and b) allow the mudguard to be strapped close to the tyre during transit. Again QD mounts at the brakes are required. The benefit of this scheme is the mudguards are much less hassle in transit; there are no loose parts to flap about or get lost.
The usual SKS chainstay mount is naturally a spring clip type; provided the brace is protected (eg by using tape) the mudguard can be quickly removed at this point. However if you mount the mudguard so that it protrudes downwards below the chainstays, you can fit the clip upside down and this makes it easier to remove the mudguard if the brake mount is in the usual place (on the front side of the seatstay brace).
Another option (which works best with wider clearances and deeper drop brakes), is to split the rear mudguard into two sections and leave the  section between the stays mounted all the time. A splice joint in the mudguard with a fastener of some kind allows a sound joint just ahead of the brake mount.
There are also brackets for QD mudguards that have a sliding barb connection beneath the fork crown; again these only work well if you have generous clearances.
So there is more than one way of skinning this cat!
cheers

Brucey,
You've posted about this before, and its something I'd like to do. Do you by chance have any pictures of these arrangements? (and the moon on a stick??)

Quick removal full mudguards would definitely be of interest and would make me much more tempted to go down the deep-drop brake route (e.g. silver Shimano BR-650s), if I could understand how to get this to work! I want to be able to remove the whole thing, though (even if it means removing the wheels first)
Old enough to know better, but young enough to do it anyway

Re: Mercian bike fit experience
« Reply #27 on: 12 June, 2018, 06:18:05 pm »
I mentioned about three different schemes, is there one that you are most interested in?

FWIW this is a type of sliding joint used to leave part of the rear mudguard on the bike


popular with rinko types, I believe. To make this kind of joint it is useful to have a captive nut in one half of the joint; the nut is made and sold separately so that you can adapt mudguards to suit.

Looks like there's more details on the Rinko-type mudguards here: https://velo-orange.blogspot.com/2010/05/rinko-fenders.html

Very pricey, though, unless you have the skills (I don't!) to make something similar homemade. Also unclear whether they come in narrower (e.g. 35mm) sizes suitable for road bikes.

Old enough to know better, but young enough to do it anyway

mattc

  • n.b. have grown beard since photo taken
    • Didcot Audaxes
Re: Mercian bike fit experience
« Reply #28 on: 12 June, 2018, 06:45:50 pm »
I mentioned about three different schemes, is there one that you are most interested in?

The cheapest of course  :P

(my hunch is that using something like chromoplastics, but with clever fittings - such as your wing-nut idea - is the most attractive. But to be honest I'm clueless about which direction to go ...

Incidentally, as the only cars I use are other peoples', I haven't often had a need to shorten the rear of the bike - but I'm contemplating another av-gas based trip in August, so plane-compatibilty could be desirable ...

Oh and of course trains.)
Has never ridden RAAM
---------
No.11  Because of the great host of those who dislike the least appearance of "swank " when they travel the roads and lanes. - From Kuklos' 39 Articles

Re: Mercian bike fit experience
« Reply #29 on: 12 June, 2018, 10:27:22 pm »
...
* when asked whether I wanted to run the rear brake cable (with full outer) through three brazed-on guides on the top of the top tube (the traditional approach), or just to run an exposed cable between two stops on the bottom left of the top tube I wasn't sure - the bike is deliberately going to be quite retro-looking, but the latter setup I thought would look neater, so that's what I said (for now). The other option would be internal routing, but that would cost quite a bit more and I didn't really like the idea. I still have time to change my mind, though, if this seems like a bad idea!

...

This may not be an issue, but I have a three-guide (full length outer) ttube steel frame, and find it easier to strap tri-bags etc to the top tube.  This compared to another bike with exposed tt cable run, where the cable, being close to the frame, slides on the straps.  My retro MTB with three exposed cables - is too tricky to bother.

My personal preference is for the rear brake cable to run under the top tube (and I like the classicism of the two outer stops and the bare wire) but this is because I like the computer on the top tube just behind the head tube. Of course this was originally because I use a wired computer running off the rear wheel for the turbo but it also has the advantage  on the road that if you have to turn the bike upside down it won't be resting on the computer fixed to the bars.

Samuel D

Re: Mercian bike fit experience
« Reply #30 on: 12 June, 2018, 11:54:37 pm »
Thanks for posting this, Oxford_Guy. I look forward to seeing your finished bicycle (and hope you don’t subject Mercian to fourteen changes of mind before you get there!).

I think one reason frame builders are often keen to usher customers in a particular direction (not that Grant sounds too pushy here) is that their customers are often pretty clueless despite ordering an expensive, custom frame. Their advice increases the odds of a happy customer in that case.

They can’t immediately know you’re a bicycle nerd who’s spent ages polishing your idea of what you want from a frame. If you want a triple, I say stick to your guns about that. It’s not a permanent decision anyway, especially if you go for a band-on front derailleur.

I'd have frame pump peg on a tourer (I have one on one of the seat stays on my Hewitt), but think will just carry a small pump on the road bike

So already you’ve made a compromise here. Compromises are fine! Every meaningful choice is a compromise and I’m often happiest with products that are clearly compromised in pursuit of a focused ideal. Following this line of thought might well justify short-reach brakes. There is certainly far greater choice of brake if you go with a short-drop frame.

[…] it also has the advantage  on the road that if you have to turn the bike upside down it won't be resting on the computer fixed to the bars.

But do you ever have to turn the bicycle upside-down? I haven’t come across a good reason to do so, although I often see people do that to fix a puncture! I find it easier to remove a rear wheel with the bicycle upright … and easier not to do the needless work of tipping a bicycle over twice.

Re: Mercian bike fit experience
« Reply #31 on: 13 June, 2018, 08:01:48 am »
the top used to be the favoured place for the brake cable at one time, either with campag band-on clips or braze-ons.  I have found that on frames that are made this way, if you stand with one leg over the frame, the cable housing (or the bare cable if it is made that way) tends to scuff the paint on the top tube.

Mounting at the 5 or 7 O'clock position is better from this POV and does not really get in the way of having a pump under the top tube.  It used to be that the position of the cable meant that you have chosen your brakes, too, since some were RH and some were LH, but modern DPs are nearly all made the same way and a LH cable mount is normal.

Needless to say a RH cable run makes for better routing of the rear brake cable with the usual brake setup; this is how Holdsworths etc were done BITD.  The top cable run will work as well with brakes of either type and indeed with the levers set up either way too.

I wonder if putting the rear brake cable on the LH is partly a cosmetic thing, as the the "drive" side of a bike is the "glamour" side that you always see in photographs, and I guess it looks neater for it not to be seen :-)
Old enough to know better, but young enough to do it anyway

Re: Mercian bike fit experience
« Reply #32 on: 13 June, 2018, 09:17:09 am »
I'm just reading Tony Oliver's _Touring Bikes_, and he recommends routing the rear brake along the lower RH side of the crossbar - he says he likes to lean against the top tube  and that cables make this uncomfortable, and that having the cable on the right makes it easier to shoulder the bike. I have a frame pump mounted under the top tube, and it does make lifting the bike a bit more unwieldy; if I were going custom I'd probably ask for a pip on the NDS seatstay.

Re: Mercian bike fit experience
« Reply #33 on: 13 June, 2018, 10:14:31 am »
I'm just reading Tony Oliver's _Touring Bikes_, and he recommends routing the rear brake along the lower RH side of the crossbar - he says he likes to lean against the top tube  and that cables make this uncomfortable, and that having the cable on the right makes it easier to shoulder the bike. I have a frame pump mounted under the top tube, and it does make lifting the bike a bit more unwieldy; if I were going custom I'd probably ask for a pip on the NDS seatstay.

That's exactly where I have a pump peg (not pip) on my Hewitt Tourer, though it do find it can mean the pump gets covered quite a bit in muck and my Zefal HPX frame pump does show quite a bit of corrosion. I've recently started carrying a smaller pump with a screw-on fitting on a hose that has an integrated pressure gauge. It seems to be able to reach quite decent pressures:
https://www.amazon.co.uk/Bike-Pump-Gauge-Pro-Tool/dp/B01ELNBSSO

There's a review here: https://www.outdoorgearlab.com/reviews/biking/frame-pump/pro-bike-tool-mini
Old enough to know better, but young enough to do it anyway

Cudzoziemiec

  • Ride adventurously and stop for a brew.
Re: Mercian bike fit experience
« Reply #34 on: 13 June, 2018, 10:16:27 am »
It does sound a pretty thorough process. It'll be interesting to see the end result, and perhaps even more so what decisions you make on the way.
Riding a concrete path through the nebulous and chaotic future.

Re: Mercian bike fit experience
« Reply #35 on: 13 June, 2018, 10:18:12 am »
It does sound a pretty thorough process. It'll be interesting to see the end result, and perhaps even more so what decisions you make on the way.

I'll post further updates and also ask for some further feedback on specification choices.

Old enough to know better, but young enough to do it anyway

Re: Mercian bike fit experience
« Reply #36 on: 13 June, 2018, 11:31:23 am »

That's exactly where I have a pump peg (not pip) on my Hewitt Tourer, though it do find it can mean the pump gets covered quite a bit in muck and my Zefal HPX frame pump does show quite a bit of corrosion. I've recently started carrying a smaller pump with a screw-on fitting on a hose that has an integrated pressure gauge. It seems to be able to reach quite decent pressures:
https://www.amazon.co.uk/Bike-Pump-Gauge-Pro-Tool/dp/B01ELNBSSO

There's a review here: https://www.outdoorgearlab.com/reviews/biking/frame-pump/pro-bike-tool-mini

Interesting - where is the corrosion on the HPX? With guards fitted I wouldn't have thought there'd be that much spray coming back there; though I must confess I don't check over my HPX as much as I perhaps should - it just lives on the bike.

Re: Mercian bike fit experience
« Reply #37 on: 13 June, 2018, 12:37:55 pm »

That's exactly where I have a pump peg (not pip) on my Hewitt Tourer, though it do find it can mean the pump gets covered quite a bit in muck and my Zefal HPX frame pump does show quite a bit of corrosion. I've recently started carrying a smaller pump with a screw-on fitting on a hose that has an integrated pressure gauge. It seems to be able to reach quite decent pressures:
https://www.amazon.co.uk/Bike-Pump-Gauge-Pro-Tool/dp/B01ELNBSSO

There's a review here: https://www.outdoorgearlab.com/reviews/biking/frame-pump/pro-bike-tool-mini

Interesting - where is the corrosion on the HPX? With guards fitted I wouldn't have thought there'd be that much spray coming back there; though I must confess I don't check over my HPX as much as I perhaps should - it just lives on the bike.

On the metal lever for securing the pump to the valve, and where it joins the pump body. This is for a pump on the LH seatstay, not the top tube. The bike in question is used as an all-weathers commuter
Old enough to know better, but young enough to do it anyway

Re: Mercian bike fit experience
« Reply #38 on: 13 June, 2018, 02:07:30 pm »

If you are planning to use the bike mostly without mudguards then 50mm drop calipers might be OK. But if it is mostly with mudguards then 60mm drop calipers are pretty much a no-brainer. 

This is probably the most important thing I need to make a final decision about for the frame, but will come back to this...


Other things that spring to mind

- do you make the gear cable stops slotted or not?
- do you have DT lever bosses with adaptors so that you can fit DT levers if required?

On my Hewitt Cheviot the gear cable stop underneath the RH chainstay has a slot, not sure if they would unless I ask on the Mercian - will check. Would you advise this (also for the STI/Ergo stops if I go for those - see below)? I guess it makes fitting a new gear cable a little easier.

 I specified STI/Ergo braze-ons, as I don't think I will ever be using DT shifters on this bike (bar end shifters I don't mind, though) and the Mercian implementation of these looks quite neat. Having said that, even though I don't use DT shifters on my Cheviot, I do find that, on bike racks on the street, I tend to lean the bike on the silver anodised DT bosses/cable stops, rather than directly on the frame, to try to avoid scratching the latter, whereas if I tried to do this with STI braze-ons, I'd probably chip the paint on them... Not sure if that is enough reason to change for these, though - maybe! Also, maybe I will decide I love DT shifters one day... Hmmm

- why not have the frame built 132.5mm so that you have a wider range of hubs that you can use?

So I could fit either 130mm or 135mm hubs? Is there any disadvantage to doing this, e.g. additional stress on the stays due to having to bend a little either way?

Quote
- do you have the fork made so that you can easily run a dynamo cable internally?
- ditto dynamo cabling to the rear?

No, I won't be running a dynamo on this bike (unlike on my Hewitt Cheviot and Brompton) - would've have been nice to have had internal dynamo cable routing on my Cheviot, though! I don't think I will be using this bike for rides that require extended night time use (e.g. long audax events), would use my Cheviot instead, and want to keep it light.

- a pump peg on the back of the head tube is a useful thing but then so is a race number braze-on...?

Don't think I want to mount a full length frame pump on this bike, and I won't be racing...

- two sets of bottle bosses or three?

Just two should be enough, and probably not much room for a third underneath the downtube. I do have three on my Cheviot, though.

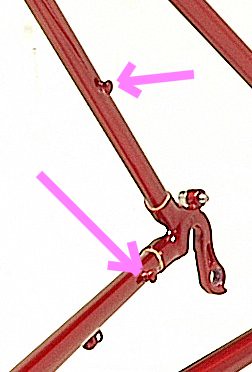
- do you have a chain hanging peg on the inside of the RH seatstay?

I haven't asked for one, but it does sound like quite a neat idea - how useful is it in practice? Would the paint on such a peg get easily chipped, though? I guess it might help reduce chain scratches on the chainstay.

Sheldon Brown didn't seem to be a fan:

"Some bikes have a small brazed-on peg facing inward near the bottom of the right seat stay. This is intended to support the chain when the rear wheel has been removed for some reason. This is, in practice, a pretty useless feature." - http://www.sheldonbrown.com/gloss_ch.html#chainhanger

I've usually been using a Pedro's Chain Keeper when working on the bike with the rear wheel off, but obviously it's not something I carry about when riding

BTW I've even seen some photos of bikes with two pegs:


- do you have mudguard fittings that allow you to QD the mudguards?

I'm not sure what I would be asking for - they said they would put a drilling underneath the seat stay cross piece, and also on the chainstay cross piece, as well as fittings on the front and rear drop-outs, so think I could remove the mudguards without disturbing the brakes too much. What else would help to make them QD?

- 74 degree seat angle is too steep for a lot of combinations of saddle and seat pin; there is no way I could use that with most leather saddles for example, because they don't slide as far back as far a lot of other saddles.

Grant seemed to think it would be okay, I said I would probably be using a Gilles Berthoud saddle, think they slide back slightly more than a Brooks. Wouldn't a seatback seat post also help? BTW don't forget I'm quite short, so the angle may not be as exaggerated as for a taller rider

- do you have double eyes and seat stay mounts so that you can fit a rack if needs be, or will it (if at all) be a minimalist one with a single centre mount at the top?

I didn't ask for either, as don't envisage carrying large loads on the bike - would use my Cheviot in those situations - if lightweight credit card touring on the Mercian, would probably just use a large saddlebag and bagman, or do the bikepacking thing.

- if you are fairly sure of the reach but expect to want to move the handlebars up and down a bit, and/or you really want the retro look (steel fork and all), there is much to be said for a quill stem and a 1" steerer.  [I can't say as I have yet seen an A-head setup on a steel framed bike like this that I like the look of in the slightest, and a 1-1/8" steel steerer is complete overkill.]

Well that's definitely what I want to go for, so that's all good :-)


- you could (bearing in mind the sporty intent of this frame) easily go 10mm shorter in the chainstays and even 20mm might be possible

Really? I think this is to allow for fitment of mudguards (and band-on for FD derailleur) - also if I do go for long drop brakes might even have to go longer?

- have you checked for toe overlap at the front, with/without mudguards?

No - but how can I check this until they build the bike? Grant seemed to be implying there would be some, but am not sure how much of an issue this would be in practice.

- Barber's pole? Why not? [BTW you may or may not want one of the stripes to be the same colour as the mudguards]

It's a serious consideration, but more on the paint job later...

Old enough to know better, but young enough to do it anyway

Re: Mercian bike fit experience
« Reply #39 on: 13 June, 2018, 02:21:58 pm »
the top used to be the favoured place for the brake cable at one time, either with campag band-on clips or braze-ons.  I have found that on frames that are made this way, if you stand with one leg over the frame, the cable housing (or the bare cable if it is made that way) tends to scuff the paint on the top tube.

Mounting at the 5 or 7 O'clock position is better from this POV and does not really get in the way of having a pump under the top tube.  It used to be that the position of the cable meant that you have chosen your brakes, too, since some were RH and some were LH, but modern DPs are nearly all made the same way and a LH cable mount is normal.

Needless to say a RH cable run makes for better routing of the rear brake cable with the usual brake setup; this is how Holdsworths etc were done BITD.  The top cable run will work as well with brakes of either type and indeed with the levers set up either way too.

I wonder if putting the rear brake cable on the LH is partly a cosmetic thing, as the the "drive" side of a bike is the "glamour" side that you always see in photographs, and I guess it looks neater for it not to be seen :-)

The side of the top tube for the brake cable should reflect the brake stirrup used.It used to be different for, e.g. Campagnolo or Weinman. Now that most makes are left cable fixing it follows that the cabling should be central or on the left.

Re: Mercian bike fit experience
« Reply #40 on: 13 June, 2018, 02:37:55 pm »
the top used to be the favoured place for the brake cable at one time, either with campag band-on clips or braze-ons.  I have found that on frames that are made this way, if you stand with one leg over the frame, the cable housing (or the bare cable if it is made that way) tends to scuff the paint on the top tube.

Mounting at the 5 or 7 O'clock position is better from this POV and does not really get in the way of having a pump under the top tube.  It used to be that the position of the cable meant that you have chosen your brakes, too, since some were RH and some were LH, but modern DPs are nearly all made the same way and a LH cable mount is normal.

Needless to say a RH cable run makes for better routing of the rear brake cable with the usual brake setup; this is how Holdsworths etc were done BITD.  The top cable run will work as well with brakes of either type and indeed with the levers set up either way too.

I wonder if putting the rear brake cable on the LH is partly a cosmetic thing, as the the "drive" side of a bike is the "glamour" side that you always see in photographs, and I guess it looks neater for it not to be seen :-)

The side of the top tube for the brake cable should reflect the brake stirrup used.It used to be different for, e.g. Campagnolo or Weinman. Now that most makes are left cable fixing it follows that the cabling should be central or on the left.

I'll either be using Campagnolo brakes (probably the pre-skeleton sort from the mud-2000s) or else Shimano BR-R650s, if I end up going with long drop brakes after all
Old enough to know better, but young enough to do it anyway

Re: Mercian bike fit experience
« Reply #41 on: 13 June, 2018, 06:01:47 pm »
the RHS cable run for the rear brake makes for a better cable run at the front (if you have the rear brake on the left) but nearly all DP calipers need  the cable set to the left at the rear, which means that the cable run from the RHS of the top tube is not so good at the back.

BTW if you are going late '80s retro and short reach (but not with ergos or STIs) then there is something to be said for campag monoplanar calipers; these suit a front right/rear left brake lever setup really well, because the cable run to the rear brake is angled. This allows a RHS cable run along the top tube in many cases.


The use of DT lever bosses and ergo adaptors (which would be the retro thing BTW) has another advantage; it allows an easily accessible barrel adjuster to be used. The only more accessible barrel adjuster for the gears is one that is fitted to the side of the head tube, but this looks a bit ugly IMHO.

If you want the fork and frame to be dynamo wire compatible for the future, it is (visibly anyway) a matter of having a few reinforcements (smaller than bottle bosses, little more than washers really) brazed to the tubes. These can be left plain and drilled out later when/if you fit a dynamo wire.  In addition the upper part of the fork blade (pref inside the socket joint to the crown) and the fork crown itself can be drilled so that the wire emerges at the base of the steerer. [A similar scheme might apply if you ever thought you would use Di2 and wanted the wiring to be neat.]

For the mudguards to be QD there is no need for an underside drilling to the seatstay brace; you can't use it without using up valuable clearance anyway, the fastener only has about three threads in it if you have a caliper brake fitted, and is bloody fiddly to reach.  You can use Sheldon fender nuts on the brakes and you can have eyes brazed on to the inside of the seat stays and the fork blades 2-3" above the hub. This allows a clean look to the bike (if you don't ever want to fit a rack, you don't have to have dropouts with eyelets at all...) When you are QDing mudguards, leaving secu-clips in the eyelets is the thing to do. Be wary of the clearance to the spokes though; if you use a LF front hub, you may need a sheet metal bracket from the eyelet to the secu clip.

Slotted cable stops are convenient; the most common gear cable maintenance task is to clean/relube the housing run to the rear mech and this is made very much easier with slotted guides (although DT/ergo bosses can help here too). Unfortunately slotted guides must be made thicker walled and they can (on a handbuilt lightweight) end up looking a little lumpen. [In contrast to this, for an IGH cable run, I have used cable stops that are 4.0mm bore and 0,5mm wall thickness; there is virtually nothing to them.]

132.5mm allows 130mm or 135mm hubs to be used without trauma in most cases. Some hubs can be permanently respaced but usually they just go in without trouble. Plenty of frames are made this way these days BTW.

To check for toe overlap, mock up an extant bike with similar cranks etc and see if the front centre measurement gives clearance with the tyres/mudguards you intend to use.

If the frame were a traditional road racing frame  then 400mm chainstays would be about normal. These can give (just) enough room for a band-on FD, 23mm tyres and mudguards.

The paint on the chain hanger peg does soon get damaged, but better this than a knackered chainstay, I would say. If you want the peg can be made of stainless steel or can be a screw-in one (e.g.to a bottle boss fitting) but anyway if it is used regularly the chain lube stops the worst of the rust.

BTW a scheme that might appeal to you is to make the frame 'convertible'. In this scheme the dropouts (front and rear) have longer slots than normal and can be fitted with stainless adaptors that contain a protrusion that enters the dropout slot, a bit like chain tug plates, but with a slot rather than a hole, if you see what I mean. They can be held captive by two small csk crews. There would be a choice of plain adaptors or ones with the lugs on. The lugs, when fitted, would prevent the wheel from going as high as normal,  thus increasing the wheel spacing to the brakes by ~5mm or so.  This would allow you to run close clearances if you wanted to, or wider clearances to suit fatter tyres and/or mudguards. A long drop brake could be simply adjusted to either configuration and if you wanted you could run ~50mm drop calipers in the short reach configuration only. The downside is that the parts for this would have to be specially made but if you really can't make your mind up it would allow you to keep your options open.

cheers

Re: Mercian bike fit experience
« Reply #42 on: 13 June, 2018, 07:45:51 pm »
the RHS cable run for the rear brake makes for a better cable run at the front (if you have the rear brake on the left) but nearly all DP calipers need  the cable set to the left at the rear, which means that the cable run from the RHS of the top tube is not so good at the back.

BTW if you are going late '80s retro and short reach (but not with ergos or STIs) then there is something to be said for campag monoplanar calipers; these suit a front right/rear left brake lever setup really well, because the cable run to the rear brake is angled. This allows a RHS cable run along the top tube in many cases.


I will be running Ergos though...

The use of DT lever bosses and ergo adaptors (which would be the retro thing BTW) has another advantage; it allows an easily accessible barrel adjuster to be used. The only more accessible barrel adjuster for the gears is one that is fitted to the side of the head tube, but this looks a bit ugly IMHO.

The way Mercian seem to do it looks like this (at least on the Strada), aren't these spring-loaded screw-in adjusters on the downtube basically doing the same thing as barrel adjusters, or is there much of a difference?:


Think these are the adjusters they would use: https://www.merciancycles.co.uk/online-shop/accessories/stainless-steel-cable-adjusters/


The alternative (which I'm not ruling out) would be to use these:

https://www.merciancycles.co.uk/online-shop/campagnolo-ergospares/ec-re001/


If you want the fork and frame to be dynamo wire compatible for the future, it is (visibly anyway) a matter of having a few reinforcements (smaller than bottle bosses, little more than washers really) brazed to the tubes. These can be left plain and drilled out later when/if you fit a dynamo wire.  In addition the upper part of the fork blade (pref inside the socket joint to the crown) and the fork crown itself can be drilled so that the wire emerges at the base of the steerer. [A similar scheme might apply if you ever thought you would use Di2 and wanted the wiring to be neat.]

Thanks for the tips - don't think I'll do this for my Mercian (and Di2 is really not my thing), but maybe when I decide to get my Hewitt Cheviot resprayed in a few years time I might get such alterations made, assuming it would be possible to do that retrospectively, after the frame has been shot-blasted?

For the mudguards to be QD there is no need for an underside drilling to the seatstay brace; you can't use it without using up valuable clearance anyway, the fastener only has about three threads in it if you have a caliper brake fitted, and is bloody fiddly to reach.  You can use Sheldon fender nuts on the brakes

I hadn't heard of these before, I assume you mean these? They seem to come in various lengths - I can see how they would allow a little more clearance, I think - would be interested to see a photo of how they look on a bike, but I think I get the general idea:

https://www.sjscycles.co.uk/brakes/problem-solvers-sheldon-fender-nuts-10-13-mm-per-pair/
https://www.sjscycles.co.uk/brakes/problem-solvers-sheldon-fender-nuts-10-32-mm-per-pair/

The ones shown in the photos above look a but rusty, though!

I assume you'd use these with a mudguard bridge on the rear? e.g.
https://www.sjscycles.co.uk/mudguards/35mm-sks-stainless-steel-rear-mudguard-bridge-each/

and you can have eyes brazed on to the inside of the seat stays and the fork blades 2-3" above the hub. This allows a clean look to the bike (if you don't ever want to fit a rack, you don't have to have dropouts with eyelets at all...)

Yes, that sounds like a possible idea, if Mercian are able to do that. Should most mudguard be compatible with fittings like this above the normal drop-out positions? Would brazing on the stays/forks, rather than the drop-outs potentially weaken the stays at all, though? Am just aware the 853 Pro team steel is very thin...

When you are QDing mudguards, leaving secu-clips in the eyelets is the thing to do. Be wary of the clearance to the spokes though; if you use a LF front hub, you may need a sheet metal bracket from the eyelet to the secu clip.

Assuming LF = Large Flange, I think I understand what you mean, by secu clips I take it these things:


Slotted cable stops are convenient; the most common gear cable maintenance task is to clean/relube the housing run to the rear mech and this is made very much easier with slotted guides (although DT/ergo bosses can help here too). Unfortunately slotted guides must be made thicker walled and they can (on a handbuilt lightweight) end up looking a little lumpen. [In contrast to this, for an IGH cable run, I have used cable stops that are 4.0mm bore and 0,5mm wall thickness; there is virtually nothing to them.]

Okay, going slotted or not doesn't sound like a something to be too concerned about, though I can understand the utility.  The stays are going to be pretty skinny, so might look better with non-slotted ones.

132.5mm allows 130mm or 135mm hubs to be used without trauma in most cases. Some hubs can be permanently respaced but usually they just go in without trouble. Plenty of frames are made this way these days BTW.

Though aren't most road hubs 130mm, or is this no longer necessarily the case?

To check for toe overlap, mock up an extant bike with similar cranks etc and see if the front centre measurement gives clearance with the tyres/mudguards you intend to use.

Okay, I could try that on my Cheviot - how much of an issue is some toe overlap in practice? BTW my feet are size 9, so not huge.

If the frame were a traditional road racing frame  then 400mm chainstays would be about normal. These can give (just) enough room for a band-on FD, 23mm tyres and mudguards.

Interesting! I might ask about that...

The paint on the chain hanger peg does soon get damaged, but better this than a knackered chainstay, I would say. If you want the peg can be made of stainless steel or can be a screw-in one (e.g.to a bottle boss fitting) but anyway if it is used regularly the chain lube stops the worst of the rust.

Good points, something to think about. BTW I was possibly thinking of fitting a sacrificial (though hopefully removable) chainstay card on the RH, though it might just look naff:


BTW a scheme that might appeal to you is to make the frame 'convertible'. In this scheme the dropouts (front and rear) have longer slots than normal and can be fitted with stainless adaptors that contain a protrusion that enters the dropout slot, a bit like chain tug plates, but with a slot rather than a hole, if you see what I mean. They can be held captive by two small csk crews. There would be a choice of plain adaptors or ones with the lugs on. The lugs, when fitted, would prevent the wheel from going as high as normal,  thus increasing the wheel spacing to the brakes by ~5mm or so.  This would allow you to run close clearances if you wanted to, or wider clearances to suit fatter tyres and/or mudguards. A long drop brake could be simply adjusted to either configuration and if you wanted you could run ~50mm drop calipers in the short reach configuration only. The downside is that the parts for this would have to be specially made but if you really can't make your mind up it would allow you to keep your options open.

Clever idea, though sounds complicated! I probably just need to make my mind up...
Old enough to know better, but young enough to do it anyway

Re: Mercian bike fit experience
« Reply #43 on: 13 June, 2018, 09:14:00 pm »
BTW this is not far off the look I'm aiming to achieve (but without the chromed forks/stays!), though my frame will be smaller (and shifters/drive train will be Campag), and I might go for a "barber's pole" on the seat tube. Not sure of the colour yet, was thinking of red or deep orange (as in the photo of the modern Strada below), but that shade of blue looks pretty nice:

(click to enlarge)


Though the frame shown is an earlier version of the Strada: https://vintagebicycle.wordpress.com/2011/08/26/mercian-strada-speciale-c-1989-my-first-new-build/

I don't see the side lug cut-outs on the modern Strada, but maybe that depends on the headtube size? I guess I could ask...


The gold-lined lug cut-outs are nicely done, nicer than black I think.


BTW I wouldn't have the cable guides on the headtube like shown here - I have similar ones on my Cheviot and found that they just wore out the cable outers at that point more quickly - I'd probably just used some Fibrax silicone spiral wraps around the cable to reduce cable rub on the headtube instead:
Old enough to know better, but young enough to do it anyway

Re: Mercian bike fit experience
« Reply #44 on: 13 June, 2018, 09:29:59 pm »
BTW one other thing that has been abit on my mind, when I was measured for the Mercian, Grant asked me to put my hands where I would normally ride (when cruising), so I put them not on the hoods themselves, but set back from them, where the bars start to curve forward, with my thumbs hooked under the top bar - as this is how I generally ride (except in busy traffic/in town/going down hill) on my touring bike (and how I was measured up by Paul Hewitt for my Cheviot, as that's what he suggested). So I think Grant my have measured my "optimal" riding position to their rather than on the hoods, but on a road bike, are you generally meant to be on the hoods pretty much 90% of the time? In which case, am I likely to be a bit stretched on the hoods? I've also only tended to use the drops for downhill or headwinds or if just really going for it on a long straight. Having said that, I don't think I felt too stretched-out on the hoods (or drops) on the jig.

My Veloce Ergos are comfortable to ride on the hoods (I used to have them on my Cheviot before I switched to bar end shifters on that, before I sent them off for a complete overhaul) it's just not how I've been riding on my Cheviot most of the time.
Old enough to know better, but young enough to do it anyway

Re: Mercian bike fit experience
« Reply #45 on: 13 June, 2018, 09:45:13 pm »
BTW here's the drawing I have of my Hewitt Cheviot tourer's geometry (some measurements missing, though e.g. chainstays, which are much longer! This was not a completely custom frame, though) compared to the Mercian ones (2nd):

(click to enlarge)

(BTW note the 74 degree seat tube angle - I don't find this a problem with my Gilles Berthoud leather saddle)


(recommend stem was 90mm, handlebar width 42 or even just 40cm)

BTW my Hewitt in it's current configuration looks like this:

Old enough to know better, but young enough to do it anyway

Re: Mercian bike fit experience
« Reply #46 on: 13 June, 2018, 09:49:29 pm »
re the DT cable stops; the ones you are looking at have a spring to prevent them from moving under their own steam; others (such as the shimano  ones) have detents that positively locate. I think the latter are less likely to move, and are sometimes more likely not to seize up once greased.

Ergo boss adaptors on lever bosses work kind of as a proxy for slotted cable guides; unscrewing the adaptor generates a load of slack in the cable which can allow inspection/regreasing of the cables to some extent.

Frame mods after shot blasting can be done with no trouble. However the neatest dynamo cable routing through the fork crown is (in some cases) best done when the frame is built in the first place.

BTW putting mudguard eyes into the lower part of stays or fork blades is usually no problem; the tubes are usually smaller diameter and thicker walled in these regions.  I have converted several road racing frames to (unobtrusively) accept mudguard eyes in this way.

BTW  in the 1950s mudguards were usually fixed to tabs that stood proud of the stays/fork blades about 3" up; so mounted the chances of getting a mudguard jam are much reduced because as soon as anything is carried around by the wheel and starts to lift the mudguard up, the gap to the wheel widens  and the object may just fall out.

Mudguard stays that are mounted level with or below the axle height (with no secu-clips) are the most dangerous, because they jam against the wheel more and more  if there is a small jam of any kind. Recently some poor blighter died in Oxford and it looks like his front mudguard was the culprit; short reach brakes, no secu-clips, stuff-all clearance and stay mounts at axle height....

cheers


Re: Mercian bike fit experience
« Reply #47 on: 14 June, 2018, 08:21:52 am »
re the DT cable stops; the ones you are looking at have a spring to prevent them from moving under their own steam; others (such as the shimano  ones) have detents that positively locate. I think the latter are less likely to move, and are sometimes more likely not to seize up once greased.

Presumably Campagnolo Ergo boss adaptors would also be less likely to move (and therefore change cable tension) on their own steam too? If so, there may be practical (as well as retro-aesthetic reasons) for going that route.

Ergo boss adaptors on lever bosses work kind of as a proxy for slotted cable guides; unscrewing the adaptor generates a load of slack in the cable which can allow inspection/regreasing of the cables to some extent.

Do you mean undoing the screw on the boss itself, rather than turning the cable tension knob?

Frame mods after shot blasting can be done with no trouble. However the neatest dynamo cable routing through the fork crown is (in some cases) best done when the frame is built in the first place.

Okay, but it can be done? Cable tie-ing the dynamo cable to the forks and frames is a bit unsightly and sometimes the cable (under the downtube) does catch on things.

BTW putting mudguard eyes into the lower part of stays or fork blades is usually no problem; the tubes are usually smaller diameter and thicker walled in these regions.  I have converted several road racing frames to (unobtrusively) accept mudguard eyes in this way.

BTW  in the 1950s mudguards were usually fixed to tabs that stood proud of the stays/fork blades about 3" up; so mounted the chances of getting a mudguard jam are much reduced because as soon as anything is carried around by the wheel and starts to lift the mudguard up, the gap to the wheel widens  and the object may just fall out.

Mudguard stays that are mounted level with or below the axle height (with no secu-clips) are the most dangerous, because they jam against the wheel more and more  if there is a small jam of any kind. Recently some poor blighter died in Oxford and it looks like his front mudguard was the culprit; short reach brakes, no secu-clips, stuff-all clearance and stay mounts at axle height....

Eek! What a dreadful story, in my hometown too :-(

I do use secu-clips on my Hewitt BTW, and they did what they were supposed to do when something got caught in rear wheel once (i.e. they popped out)
Old enough to know better, but young enough to do it anyway

Re: Mercian bike fit experience
« Reply #48 on: 14 June, 2018, 08:31:20 am »
BTW here's the drawing I have of my Hewitt Cheviot tourer's geometry (some measurements missing, though e.g. chainstays, which are much longer! This was not a completely custom frame, though) compared to the Mercian ones (2nd):

(click to enlarge)

(BTW note the 74 degree seat tube angle - I don't find this a problem with my Gilles Berthoud leather saddle)


(recommend stem was 90mm, handlebar width 42 or even just 40cm)

BTW do you think it's odd at all that the drawings indicate a 52cm frame for the Mercian, but a 54cm for my Hewitt, especially as they both have the same seat tube angle of 74 degrees?

Also with the recommend 90mm stem for the Mercian, the reach seems longer on the Hewitt, which is the opposite of what I would expect for a road bike - or am I not taking into account other differences in geometry - shorter seat stays, different headtube angle/fork trail, horizontal top tube (Mercian) vs sloping "compact" top tube (Hewitt) etc., which may affect the riding position? They did say that the riding position they've spec-ed is not as aggressive as they normally would do for the Strada, because of my comfort issues (bad back etc.), but I'd understood would still be more "race-like" than my Hewitt. It's also a bit hard to see how the measurements and angles would look in practice without a CAD drawing, not sure if this is something Mercian would do, though.

Just a little concerned that the bike fit may not be quite right, which obviously is a worry if spending a load on a custom frame! I guess I could visit them again to make sure, but that would cost me more time and money.
Old enough to know better, but young enough to do it anyway

Re: Mercian bike fit experience
« Reply #49 on: 14 June, 2018, 09:11:26 am »
You could compare the geometries using a visual tool? This one was mentioned in a thread the other day: http://gearinches.com/blog/misc/bike-geometry-comparator